Google Map URL setup
Basic Overview on the Creation of a Google Map URL
- The ship.vbs script must be downloaded, configured and placed in the SP directory.
- The required script/program can be downloaded from be downloaded from the Yahoo , folder VB Scripts. Download and you will find the file vbship.vbs. in the Zip archive
ShipPlotter files area vbship4.zip
- You can use either the Windows Scheduler (see instructions below) or Program Executioner.
- Program Executioner (V1.2.1) can be downloaded here & installed in your normal programs directory. Next download the upgrade version and install it on top of the original version. (important) It also has to be configured before use.
- SP must be running and showing ship data on the area selected.
- Test the upload manually by clicking the ship.vbs file. An data.xml file will be created and uploaded to the remote server in Reno running LIVEAISWORLD. A copy will also be produced in your SP/log files/ directory for control purposes.
- Now that you have proof it is working and uploading the data.xml file, you can start the scheduling program executioner.
- Your area will now be displayed in the appropriate area of:
http://liveaisworld.yachtmarine.com/LIVEAISWORLD.html
Setting up the ship.vbs script
Rename to someting appropriate for your area, i.e. newyork.vbs
Configure the script as follows:
strDirectory = "C:\Program Files\COAA\ShipPlotter\log files" (if different, change to correct path)
strFile = "nycdata.xml"
' Suppress Popup if upload succeeded (True or False, no quotes):
ShowSuccess = False
' Do you want to FTP the file to a website? (True or False, no quotes):
doFTP = True
' Do you want to restrict the output to the screen lat/long?
useBBox = False
' You only need to set these values if you have doFTP = True
' FTP address for your web site, eg "ftp.myISP.com"*
FTPaddr = "ftp.aisserver.yachtmarine.com"
' FTP username for your site:
UserName = "member"
' FTP password for your site:
' Ask Tore for the actual password
Password = "xxxxxx"
' subdirectory on FTP site to put data.xml file
RelPath = "/httpdocs/"
' Extra command to send to ftp server, eg "passive"
Ftpextra = ""
writexml()
Now save your configured xxx.vbs script
Setting up the Program Executioner
You can of course use the Windows Scheduler instead but it is a bit more difficult to handle. Program Executioner does not have all the 'bells and whistles' but is easier to use. After installing and upgrading to the latest version, start the program and configure as follows:
- Enter the path to your xxx.vbs script in the SP directory and (important) enclose the whole path line in single quote marks (")
- Mark the black dot that says 'script' and set the timing for 5 minutes. Do not make any changes in the date/time fields as the program will
- initially use your PC date/time.
- ONLY run the program executioner when SP has been running for a few minutes showing ship data on the map of the area you antenna covers. If SP is not running or no data is produced you will get an error message.
In order to set up the Google Map script running on our fast, remote server, we need to know your EXACT geographical location, the name you have selected for your xxx.vbs file, AND, most important, the name of your data.xml file. for example: nycdata.xml, oregondata.xml etc. You will not need to apply for a separate Google Key.
General remarks
This is an easy way to give a real-time display of the vessel traffic in your area by simply running SP and Program Executioner, uploading your xxx.xml ship data file to our server automatically. Both programs can be run in 'minimized' mode so you won´t even know they are there.
A full hosting, which runs independently of your PC can in some cases also be offered by installing a TCP/IP converter between your dedicated AIS receiver and your internet ADSL connection, feeding your data on a 7/24 basis to one of our servers running SP. If interested, please ask for details.
Happy plotting!
Windows Task Scheduler setup for use with Google Map systems
The following screen-shots (coming soon) show the setup of the Windows Task Scheduler and are largely self-explanatory. The most important thing is to remember the inverted commas (") before and after the path to your ship.vbs file, and to log in with your Windows systems administrator username/password. If you never used one before, you will have to create one now as the scheduler does not work without it. The setup illustrates activates the ship.vbs file in the SP directory which will create a data.xml file of your running SP ship data of the area within the range of your station and upload it to our remote server for display on a pre-defined Google Map co-ordinate created by a script residing there.
Adding a new scheduled task (by David Taylor)
1 - Use the Start menu, Control Panel, Scheduled Tasks function. You will get a display similar to this. Double-click on Add Scheduled Task

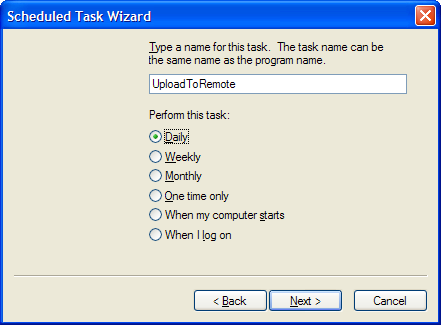
You will next get the scheduled task wizard which looks like the screen-shot below (it may also have a decorative graphic which has been stripped here to make the image file size smaller).

Click on the Browse button to locate the file ship.vbs in your C:Program FilesCOAAShipPlotter directory. Now you can choose a name for your task (such as UploadToRemote), and ask that the task be performed every day. Later you will make it run every five minutes. Press Next.
The Start time doesn't really matter. Ensure that Every Day is checked, and press Next.

You need to enter a user name and password for the task.

Almost done with the Wizard, but you need to ensure that the Advanced properties of the task open, ready to set the 5-minute interval. Then press Finish.

Select the Scheule tab of the properties dialog, and press the Advanced button.

The settings you need to change are as follows. Ensure the Repeat task box is checked. Change the 10 minutes shown to 5 minutes, and click OK.

Finally, you can tell Windows that the taks should be stopped if it runs for more than 24 hours. Remember that a new task is run every day, and that task is repeated every five minutes.

Now Tore describes how to the completed scheduled task should appear
From the Control Panel, or Explorer, view the Scheduled Tasks folder:

When adding a scheduled task you need to define the user name and password:

In the Advanced properties dialog, set the task to repeat every five minutes:

Set the task to be stopped if it has been running for 24 hours.

Make the task run once a day at the specified time:

Happy hunting !!
Tore Christiansen
Resetting the default Start & Stop for Program Executioner
To delete the bad data in the registry follow these steps:
- Run Regedit (to get to the registry)
- Click on the plus sign in front of HKey_Current_User
- Click on the plus sign in front of Software
- Click on the plus sign in front of VB and VBA Program Settings
- Click on the plus sign in front of Executioner
- Click on DateTime
- In the right pane, Right Click on Start
- Select Delete from the popup menu and answer Yes to "Are You Sure"
- In the right pane, Right Click on Stop
- Select Delete from the popup menu and answer Yes to "Are You Sure"
- Close the Regedit window and start Executioner again.
It should now work OK but you'll have to re-enter the start and stop times. Be careful. As you can see there is very little checking done here for incorrect data entry. If the program becomes more popular I'll make it more stable and add features.
Comments (0)
You don't have permission to comment on this page.